Fathead bread thins

Fathead Bread is a great alternative to traditional bread. This recipe is super easy and makes a good amount of thins that are perfect to use as a base for loads of other things. Use it to sandwich other recipes and ingredients such as Cream Cheese, Salmon, Prawns or anything you fancy.
How to make sweet and sour sauce recipe for low carb diets

This quick and easy low carb sweet and sour sauce recipe is perfect for chicken, pork or anything else you want to put it on. The perfect balance of sweet ketchup with sour Cider Vinegar makes this the perfect sauce for many types of meat.
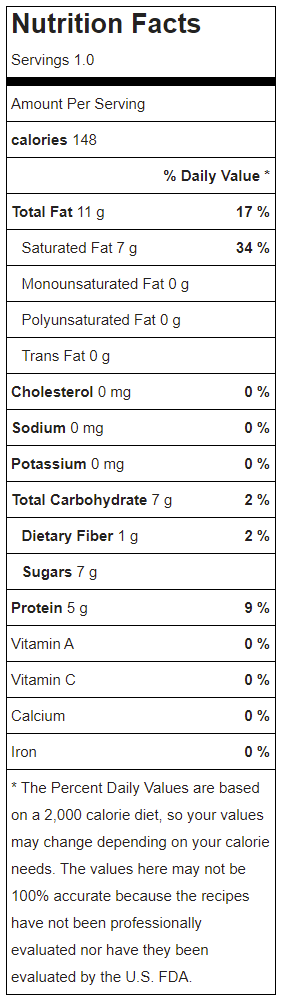
Keto flourless pancakes

This Keto Flourless Cinnamon Pancakes in 30 seconds recipe is so quick easy and delicious. Cinnamon and a drop of honey is the perfect accompaniment for this low carb treat.
Easy curry powder recipe in 5 minutes

This super tasty and easy curry powder recipe only take 5 minutes to prepare and so so simple to put together. This is so much better than any curry powder you will ever get from the store and is way more aromatics and tasty.
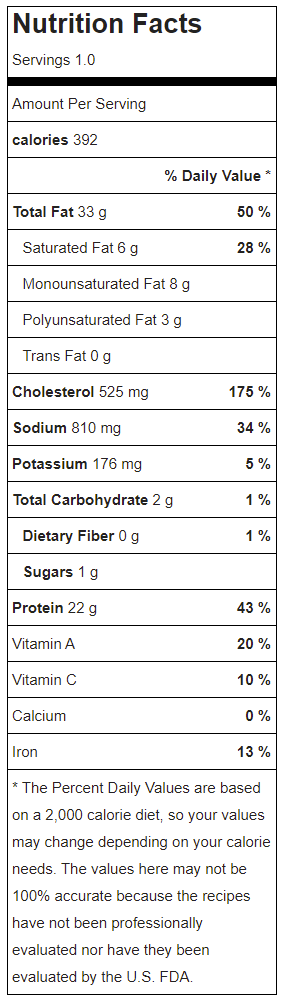
Scrambled eggs with salmon, dill and lemon

OK, so we all know how to make scrambled eggs. The recipe is nothing new. Crack eggs, mix eggs, cook eggs and you have Scrambled Eggs. Umm, well yes, technically you have Scrambled Eggs, but how about the humble eggs full potential, does anyone think about that.
Eggs are one of those little wonders gifted to us from the chickens. Full of proteins and goodies which I’m not going to try and impress you with, however, if you are interested then I have taken the liberty of having a quick google for you here.
So there are a few tricks to elevate the humble plate of Scrambled Eggs to a plate of true inspirational goodness. Butter, Lemons and Chives. These three things will push your dish over the edge.
Ingredients
| Large Egg | 2.5 |
| Dried Chives | 1 tbsp |
| Full Fat Button | 15g |
| Smoked Salmon | 25g |
| Fresh Dill of Parsley | 2 tsp |
Method
- Mix the eggs until completely combined
- In a heated non stick pan, with no oil, pour in the eggs. The trick here is low and slow. Take your time, the pan should not be blistering hot, the entire cook may take 5-10 minutes.
- sprinkle in the chives
- Move the egg around the pan while its cooking. As it starts to set up keep chopping it up with the spatula or you will end up with an omelette.
- once the eggs have cooked about 75% of the way, throw the butter in the middle and move it around so it coats all of the egg.
- The resulting consistency should not be completely set up, you wont it to look a little moist.
- Take it off the heat and pop it on a plate of your choosing
- Twist the salmon and lay it on top of the eggs, drizzle wit the lemon juice and garnish with chopped fresh dill.
The trick here is to take your time. If you cook it too fast then you will end up with rubbery bouncy Scrambled Eggs which is not the end of the world but we can do better. Take you time and let the ingredients sit together for a few minutes allowing the flavours to marinade together.
As always, put your own spin on it and make it your own. This is only a guide and there may well be better variations, however, the combinations in this one are tried and tested.
Go crazy, and don’t forget to add your creations in the comments for everyone else.
Enjoy!
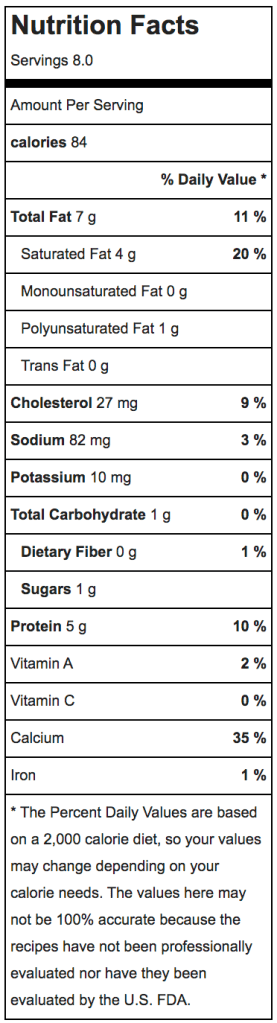
Breakfast Yoghurt with berries

This is not the most complicated of recipes, in fact one might say that it was more of an arrangement of ingredients, a preparation. Whatever you choose to call it, there is a beauty in its simplicity, and for that reason it deserves a place in this blog.
The wonderful thing about preparing this recipe is that it can be done incredibly easily, yet the out come truly is a thing to behold. An indulgent and refreshing breakfast alternative that can be used as a blank slate for many variations.
Ingredients
| Greek Style Natural Yoghurt | 100g |
| Blueberries | 25g |
| Black Sesame Seeds | 2g |
Method
There are so many ways in which you can prepare this, you really are only limited by your imagination. I found that adding around 10g of low carb granola and leaving out the sesame seeds is very nice. Another alternative is to use raspberries with a little fresh mint.
- In a glass of your choosing, I found a wine glass is quite nice, add the Greek Yoghurt.
- Add the Blueberries on top followed by the Sesame Seeds
- Enjoy with a Latte spoon just because it feels fancy.
Variations
The important thing to remember here is that this is a base recipe that can be used in which ever way you can come up with. So go nuts and invent your own Breakfast Yoghurt and if you like share it in the comments below so everyone can try it out.
Enjoy
Fathead bread thins

It would be a lie to say that this was entirely my recipe. Fathead bread was around way before I found out about it. However, as always I have put my own spin on it and tried to make it a little more special. In this recipe we will be taking the humble Fathead bread and not so much reinventing it but reimagining its use from a simple pizza base to something that can be used for everyday dishes.
Ingredients
| Large Egg | 1 |
| Garlic Powder | 1/4 tsp |
| Baking Powder | 1 tsp |
| Almond Flour | 1/3 cup |
| Full fat Cream Cheese | 2 tbsp |
| Grated Mozzarella Cheese | 90g |
| Grated Mature Cheddar Cheese | 55g |
Method
- Preheat the oven to 180c (fan)
- Add the Mozzarella, Cheddar and Cream Cheese into a large mixing bowl and pop it in the microwave for about 2 mins, checking and mixing after 1 minute. repeat until all the cheeses have melted.
- Once all the cheeses are combined, add all of the dried ingredients and mix with a silicone spatula until the mixture is nice and smooth (it should look like very thick semolina a this point).
- Cut off 2 large sheets of baking parchment, each around 60cm long, laying the first on a flat surface.
- Empty the mixture into the middle of the baking parchment and spread it indo a disk about 5″ across then place the other piece baking parchment squarely on top.
- With a rolling pin roll out the mixture between the two bits of baking parchment until it is about the depth of a 10p coin (you can adjust this according to how you like it).
- Cut the rolled out sheet in two so that it will fit in the oven
- back for 3-5 minutes depending on how crispy you would like it. Be aware it will cook very fast so stay close.
- Once baked, leave it on the side before removing the baking parchments and cutting into 8-10 rectangles.
A great way to use this recipe is to sandwich a yummy mixture between the slices. Good options would be Prawn Mayo, Chicken, Bacon & Mayo (as I have done above) or using it as a bed for Salmon & Cream Cheese (below). The uses are limited only by your imagination. This is a fantastic low carb base for many other dishes so go and discover, and don’t forget to leave your ideas in the comments for others to enjoy!

Recipe adapted from: https://www.allrecipes.com/recipe/273073/keto-fathead-bread/?utm_source=pinterest.com&utm_medium=social&utm_campaign=social-share-recipe&utm_content=20210510&utm_term=273073
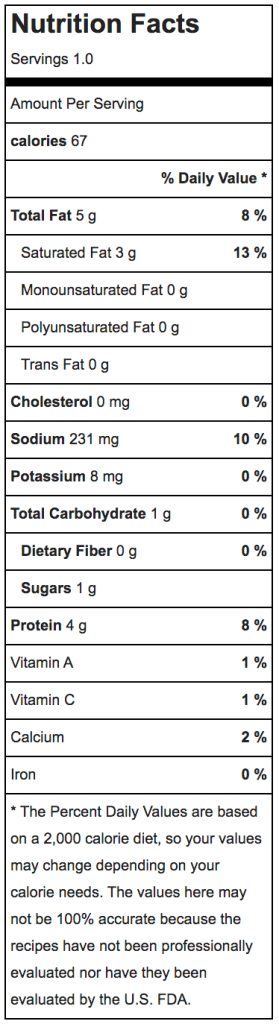
Lettuce boats with Salmon and Cream Cheese

This is such an incredibly simple and satisfying recipe and can be put together in no time at all, not only that it looks fabulous. Picture yourself sitting the garden, while others are eating boring old sandwiches you could be sat with the delightful flavours of Salmon and Cream cheese on your pallet.
No cooking is required here, just simple preparation which should take less than 5 minutes and could even be prepared in the morning or ahead of time and popped in the fridge for later.
Ingredients
| Romaine Lettuce Leaf | 1 (15g) |
| Hickory & Applewood Smoked Scottish Salmon (Lidl) | 10g |
| Full Fat Cream Cheese | 15g |
| Fresh Dill | 1/8 tsp |
| Lemon Zest | 1/8 tsp |
Method
- Zest the lemon and roughly chop along with the Dill
- Lay the Romaine Lettuce leaf our flat and remove the bottom where the spine is thickest as we will be unable to roll this.
- Spread the Cream Cheese evenly over the inside of the leaf being sure not to pierce the leaf.
- Sprinkle the chopped Lemon and dill evenly over the cream cheese layer
- Gently lay the salmon over the Cream Cheese, Lemon & Dill layer.
- From the top of the leaf, roll the leaf up to form a small wrap
- Pop a cocktail stick through the wrap and using a pair of scissors and chop off any excess stick. this will prevent the wrap from unraveling.
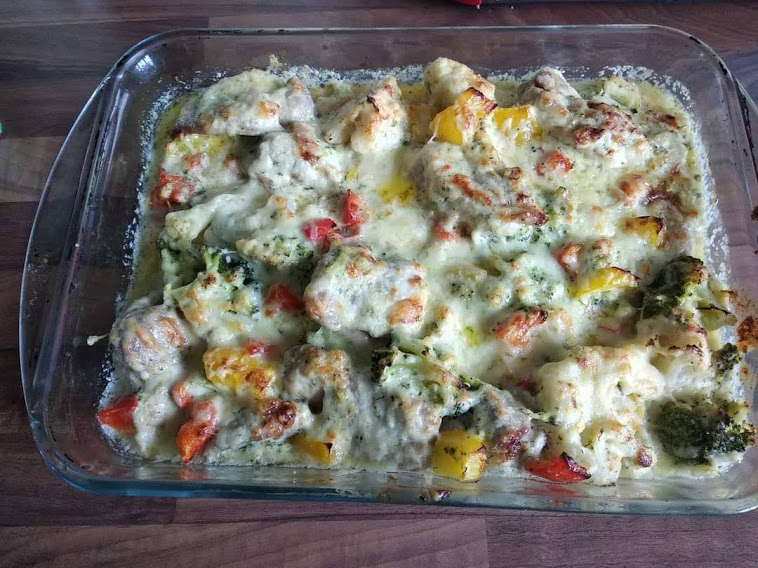
Ranch Chicken Casserole

This has to be one of my all time favourite recipes I have come across. Plus a great way to get your veggies in, which makes it a great family dish. I mix all in a bowl before placing in the ovenproof dish as easier for me, but if you prefer, you can do it in the dish to save something else needing to be washed up. The flavours from the seasoning are absolutely incredible and not too over powering, but make go Mmmmm . Once you have made up the Ranch seasoning, it can be kept in a sealed container for up to 6 months, so you don’t need to keep making it up. Also leftovers of the casserole will last 4 days in the fridge or up to 3 months if frozen.
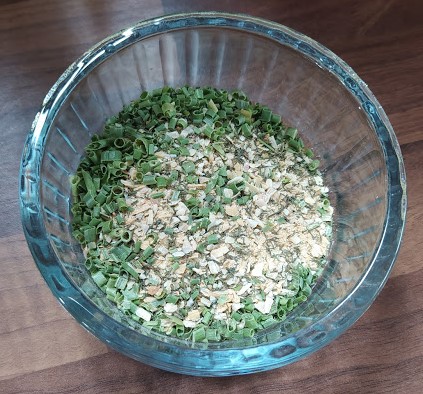
Ingredients
Makes approximately 65g
| Dried Parsley | 3 tbsp |
| Dried Chives | 2 tbsp |
| Garlic Powder | 2 tbsp |
| Onion Powder | 2 tbsp |
| Dried Dill | 1 tbsp |

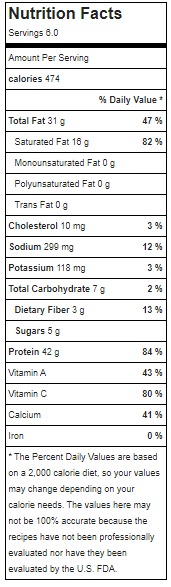
Ranch Chicken Casserole
Makes 6 Servings
Ingredients
- 1 Tablespoon Ranch Seasoning
- 230g Full-fat Sour Cream
- 1 Cauliflower (approx. 400g)
- 1 Broccoli (approx. 300g)
- 2 Tbsp Butter
- 600g Boneless Chicken
- 1 Medium Red Pepper
- 1 Medium Yellow Pepper
- 226g Grated Cheese
Instructions
- Add the Ranch Seasoning to the sour cream in a large bowl and mix well followed by the grated cheese leaving enough to sprinkle on the top.
- Pre-heat the oven to 190o/375oF/Gas Mark 5
- Bring a saucepan to the boil and add the cauliflower and broccoli and cook for 5 minutes. Afterwards drain and put to the side.
- In a large frying pan add the butter and once hot add the chicken and cook on a medium to high heat for 5-7 minutes
- Once the chicken is browned and both peppers and cook for 1-2 minutes.
- Add the cauliflower and broccoli to the sour cream mix and stir in well. Afterwards add the chicken and peppers and mix well again.
- Place all into an ovenproof dish and top off with the remainder of the cheese.
- Cook for 20 minutes in the oven.
This recipe is based from one in the Keto Slower Cooker & One-Pot Meal Book, but has been altered to my personal taste and can be altered to yours.
Written by Caz
GRANDMA SHARK Mortar and Pestle Review
The GRANDMA SHARK Mortar and Pestle Set is only the third Mortar & Pestle set I have ever owned. Previously I have owned a wooden Mortar & Pestle and another smaller and lighter ceramic one. Both of these previous versions I used didn’t really stack up. The first ceramic Mortar & Pestle set I had was way to light and didn’t last long. The wooden one was as you would expect, light and well.. wooden and just split.
This time around I decided to push the boat out and go with a granite set. This was a little more expensive but I figured I would rather buy something that was going to stand the test of time unlike its predecessors.

Sturdiness
The first thing to note about this product is the sheer weight of the thing. Being granate this is a heavy bit of kit. This is no bad thing though and was what I was missing from the previous two versions I had. The Mortar is quite wide with very thick sides and sits quite low. This provides an excellent base and prevents any possibility that it may topple over. The outside width and depth of 6.5″ and 3″ respectively (5″ x 2.5″ inside)
The Pestle, or club as I like to call it, is also made of granite so is plenty heavy for all its future grinding activities. Both the inside of the Mortar and club end of the Pestle are rough and unfinished providing lots of grinding surface while the handle and exterior of the set are polished to a relatively high finish.
All in all this is a great bit of kitchen equipment, it grinds seeds such as Coriander, Nutmeg, Black Pepper and the like extremely well as well as wet mixes such as Salsa and is very easy to clean as it is so wide. The only negative I would add would be that the sides could be a touch higher, however, this is very minor and is only really an issue if you fill it right up.
In conclusion, if you don’t have one already, the GRANDMA SHARK Mortar and Pestle Set is a great bit of kit that is very solid and versatile and shoud last almost as long as you.

Recent Comments